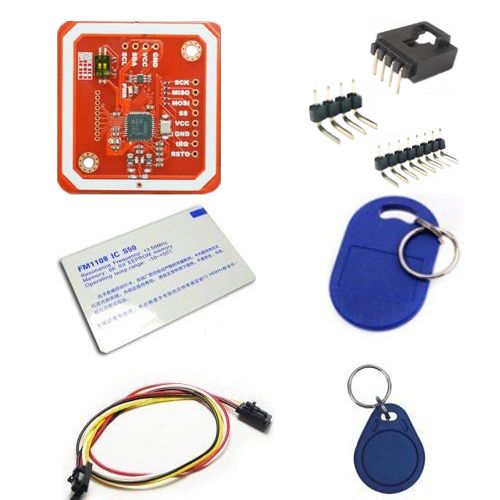
Small RFID readers can be placed almost anywhere today. Behind a wall or door to give access by unlocking door when the right tag comes along.
Also be aware that many smartphones has an RFID send function today which can be used with your RFID reader.
With the provided example you can program which tags should unloock (enable) the attached relay. To find out the unique ID of your tag just run the example while looking at serial monitor. Hold tag in front of reader and your identifier should pop up. Copy this and add it to the validKeys array in the program. Then re-compile sketch to enable your new access keys.
Wiring Things Up
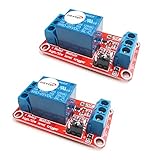
Start by connecting the radio module.
Now connect the RFID module!
| Sensor | Arduino |
|---|---|
| GND | GND |
| VCC | +5V |
| SCL | A5 |
| SDA | A4 |
Example
This example uses the external libraries PN532 and PN532_I2C found here. Please install them and restart the Arduino IDE before trying to compile.

/**
* The MySensors Arduino library handles the wireless radio link and protocol
* between your home built sensors/actuators and HA controller of choice.
* The sensors forms a self healing radio network with optional repeaters. Each
* repeater and gateway builds a routing tables in EEPROM which keeps track of the
* network topology allowing messages to be routed to nodes.
*
* Created by Henrik Ekblad <[email protected]>
* Copyright (C) 2013-2015 Sensnology AB
* Full contributor list: https://github.com/mysensors/Arduino/graphs/contributors
*
* Documentation: http://www.mysensors.org
* Support Forum: http://forum.mysensors.org
*
* This program is free software; you can redistribute it and/or
* modify it under the terms of the GNU General Public License
* version 2 as published by the Free Software Foundation.
*
*******************************
*
* REVISION HISTORY
* Version 1.0 - Henrik Ekblad
*
* DESCRIPTION
* RFID Lock sensor/actuator
*
* Use RFID tag to lock/unlock a door or trigger a scene on your controller.
* This example sketch allows you to add an optional relay or solenoid
* which can be activated/opened by RFID or controller.
*
* Use the I2C wiring option for your RFID module and connect to the following Arduino pins.
*
* RFID Arduino
* ----- -------
* GND -> GND
* VCC -> +5V
* SCL -> A5
* SDA -> A4
*
* Use normal wiring for NRF24L01 radio
*
* Attach a optional relay or solonoid lock to pin 4
* http://www.mysensors.org/build/rfid
*/
// Enable debug prints to serial monitor
#define MY_DEBUG
// Enable and select radio type attached
#define MY_RADIO_RF24
//#define MY_RADIO_RFM69
#include <MySensors.h>
#include <Wire.h>
#include <PN532_I2C.h>
#include <PN532.h>
// Add your valid rfid keys here. To find you your key just run sketch; hold your new RFID tag in fron ot the reader;
// and copy the key from serial output of this sketch.
const uint8_t maxKeyLength = 7;
uint8_t validKeys[][maxKeyLength] = {
{ 0xB3, 0xC6, 0xD9, 0x80, 0x00, 0x00, 0x00 },
{ 0, 0, 0, 0, 0, 0, 0 }, // ADD YOUR KEYS HERE!
{ 0, 0, 0, 0, 0, 0, 0 }};
int keyCount = sizeof validKeys / maxKeyLength;
#define CHILD_ID 99 // Id of the sensor child
// Pin definition
const int lockPin = 4; // (Digital 4) The pin that activates the relay/solenoid lock.
bool lockStatus;
MyMessage lockMsg(CHILD_ID, V_LOCK_STATUS);
PN532_I2C pn532i2c(Wire);
PN532 nfc(pn532i2c);
void setup() {
pinMode(lockPin, OUTPUT);
nfc.begin();
uint32_t versiondata = nfc.getFirmwareVersion();
if (! versiondata) {
Serial.print("Couldn't find PN53x board");
while (1); // halt
}
Serial.print("Found NFC chip PN5"); Serial.println((versiondata>>24) & 0xFF, HEX);
Serial.print("Firmware ver. "); Serial.print((versiondata>>16) & 0xFF, DEC);
Serial.print('.'); Serial.println((versiondata>>8) & 0xFF, DEC);
// Set the max number of retry attempts to read from a card
// This prevents us from waiting forever for a card, which is
// the default behaviour of the PN532.
nfc.setPassiveActivationRetries(0x3);
// configure board to read RFID tags
nfc.SAMConfig();
lockStatus = loadState(0); // Read last lock status from eeprom
setLockState(lockStatus, true); // Now set the last known state and send it to controller
}
void presentation() {
sendSketchInfo("RFID Lock", "1.0");
present(CHILD_ID, S_LOCK);
}
void loop() {
bool success;
uint8_t key[] = { 0, 0, 0, 0, 0, 0, 0 }; // Buffer to store the returned UID
uint8_t currentKeyLength; // Length of the UID (4 or 7 bytes depending on ISO14443A card type)
// Wait for an ISO14443A type cards (Mifare, etc.). When one is found
// 'uid' will be populated with the UID, and uidLength will indicate
// if the uid is 4 bytes (Mifare Classic) or 7 bytes (Mifare Ultralight)
success = nfc.readPassiveTargetID(PN532_MIFARE_ISO14443A, &key[0], ¤tKeyLength);
if (success) {
Serial.print("Found tag id: ");
for (uint8_t i=0; i < currentKeyLength; i++)
{
if (i>0) Serial.print(",");
Serial.print("0x");Serial.print(key[i], HEX);
}
for (uint8_t i=currentKeyLength; i < maxKeyLength; i++)
{
Serial.print(",0x00");
}
Serial.println("");
bool valid = false;
// Compare this key to the valid once registered here in sketch
for (int i=0;i<keyCount && !valid;i++) {
for (int j=0;j<currentKeyLength && !valid;j++) {
if (key[j] != validKeys[i][j]) {
break;
}
if (j==currentKeyLength-1) {
valid = true;
}
}
}
if (valid) {
// Switch lock status
setLockState(!lockStatus, true);
}
// Wait for card/tag to leave reader
while(nfc.readPassiveTargetID(PN532_MIFARE_ISO14443A, &key[0], ¤tKeyLength));
}
}
// Unlocks the door.
void setLockState(bool state, bool doSend){
if (state)
Serial.println("open lock");
else
Serial.println("close lock");
if (doSend)
send(lockMsg.set(state));
digitalWrite(lockPin, state);
saveState(0,state);
lockStatus = state;
}
void receive(const MyMessage &message) {
// We only expect one type of message from controller. But we better check anyway.
if (message.type==V_LOCK_STATUS) {
// Change relay state
setLockState(message.getBool(), false);
// Write some debug info
Serial.print("Incoming lock status:");
Serial.println(message.getBool());
}
}