To start your own sensor-building career you must have a small starting kit. It should probably consist of some Arduinos, radios, cables and sensors. Here is a buying guide for 10 wireless sensors.
Base components
- 10pcs of radio modules for communicating with your sensors. If you have a large area to cover, have a look at the antenna version for the gateway and repeater nodes.
- 160pcs of Female to Female cables for connecting radio and sensors.
- 80pcs of Female to Male cables for connecting sensors and breadboard.
- 80pcs of Male to Male cables for Arduino Uno and breadboard.
- A prototyping breadboard can also be handy when trying out your ideas.
- Capacitors to stabilize power to the radio module.
- Pull-up-resistors for your temperature sensors.
- Also remember to select some cool sensors . We've tried to list many different useful sensors in the shop. Try to find the once suitable for your project. Temperature probes and humidity sensors is always good to have. Some relays for controlling things. Reed switches to get door/window statuses. Maybe you also want to detect motion?
Choosing Arduino Clone
You'll have to select a good mix of boards for your sensor projects.
Easy and flexible
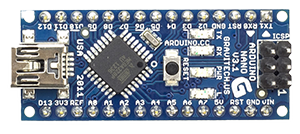
Nano is easy to program (USB connector is build in). It has both 5V and 3.3V output so you can hook up both radio and 5V sensors without fiddling with regulators. Power it from computer or any type of 5V USB wall-wart. Note: If you want to build an Arduino gateway for the Vera controller you will need one of these!
Cheap and flexible
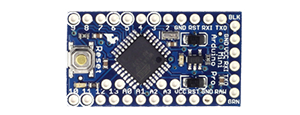
Pro Mini 5V is great if you want to build super cheap sensors (nanos can be a bit pricey).
There is only one little problem with this module that need to be addressed and that is how to feed the radio with the correct 3.3V power. Luckily you can use a 5V to 3.3V regulator.
Pro mini is missing USB connections. To be able to download programs to the module, you will also need a FTDI USB to TTL Serial Adapter.
-
Battery operated
Pro Mini 3.3V is great for battery operated sensors.
No regulator is needed for the radio, but if you are using sensors that requiring 5V (like PIR) you might also need a step-up regulator.
Like 5V version, you will also need a FTDI USB to TTL Serial Adapter. Make sure to run it in 3.3V mode!
For prototyping
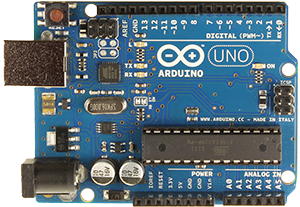
Uno R3 is bigger and it is much easier to reach all connectors. When testing and playing around we recommend to have one of these. There are also a lot of fun shields (add-ons) available for Uno R3.
The easy way
 The MySensors community offers an Arduino compatible, battery optimised module called [Sensebender Micro](/hardware/micro). It has a build in temperature and humidity sensor and allows you to connect additional sensors.