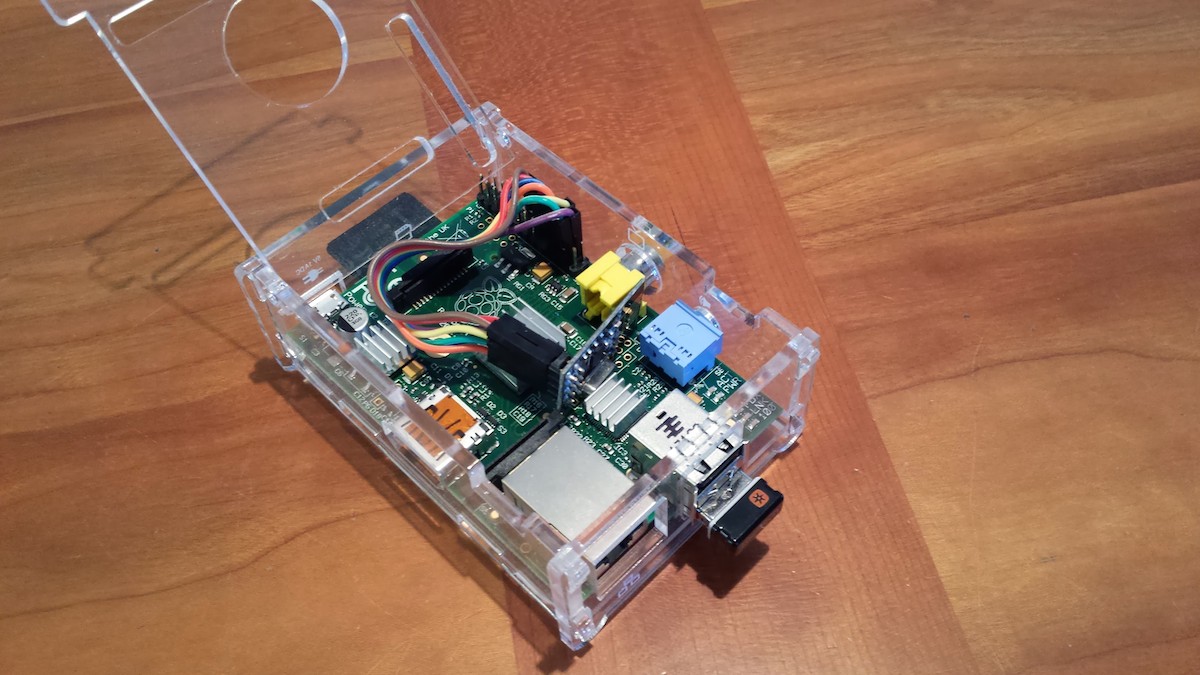
 Raspberry Pi is a small computer that uses very little power (2-3 watts). It has all the horsepower necessary to serve as a cloud-enabled all-in-one Controller.
Several controllers available here can run directly on the RPi. E.g. OpenHAB and PiDome.
Download MySensors
Login to your Raspberry Pi and get the code from MySensors repository (master branch):
git clone https://github.com/mysensors/MySensors.git --branch master
cd MySensors
Note: It seems there are communication issues with radio modules with latest "Jessie" versions, so development version is advised if problem arises.
To use the development version with the latest updates:
git clone https://github.com/mysensors/MySensors.git --branch development
cd MySensors
Configure
A list of options to set the gateway is available by running the command:
./configure --helpNote: In options that requires a pin number, use the Raspberry Pi physical pin number and not the GPIO numbers.
Note: All options must be added to the same line, after ./configure
Transport
The transports available are: rf24, rs485, rfm95, rfm69
RF24
--my-transport=rf24RFM69
--my-transport=rfm69 --my-rfm69-frequency=868 --my-is-rfm69hw
The frequency can be set to 315,433,868 or 915 Mhz; --my-is-rfm69hw enables high-powered rfm69hw radios.
Note: The RaspberryPi uses the new RFM69 driver which is not compatible with the old (=default) RFM69 driver, you need to add #define MY_RFM69_NEW_DRIVER to your nodes to properly communicate with the gateway.
Gateway type
The types available are: ethernet, serial, mqtt
Ethernet gateway
By default, the gateway is built for ethernet and it listens on port 5003:
--my-gateway=ethernet --my-port=5003To set the gateway as a client that connects to a controller, use:
--my-gateway=ethernet --my-controller-url-address=YOUR-CONTROLLER-ADDRESSor
--my-gateway=ethernet --my-controller-ip-address=YOUR-CONTROLLER-IPSerial gateway
If you are running a controller on the Raspberry Pi that doesn't support communication with the gateway through ethernet, you can use a virtual serial port:
--my-gateway=serial --my-serial-is-pty --my-serial-port=/dev/ttyMySensorsGatewayFor some controllers a more recognisable name needs to be used: e.g. /dev/ttyUSB020 (check if this is free).
MQTT
The following is an example of how to build a MQTT gateway:
--my-gateway=mqtt --my-controller-ip-address=127.0.0.1 --my-mqtt-publish-topic-prefix=mysensors-out --my-mqtt-subscribe-topic-prefix=mysensors-in --my-mqtt-client-id=mygateway1Build
To build the gateway, run:
makeIf there were no errors during compilation the file bin/mysgw will be created. If you get
No supported SPI driver detectedyou need to enable SPI by running sudo raspi-config, Advanced -> SPI -> yes and reboot your Pi. Then run make again.
Configuration file
There are some gateway settings that can be made through the configuration file, in which its default path is /etc/mysensors.conf, but you can set a different path with the --my-config-file=
The options present in this file can be changed without the need to recompile the gateway, a simple restart is sufficient for them to take effect.
The first time you start the gateway the configuration file will be created if it does not already exist.
The default settings are:
# Logging
# Verbosity: debug,info,notice,warn,err
verbose=debug

# Enable logging to a file.
log_file=0
# Log file path.
log_filepath=/tmp/mysgw.log

# Enable logging to a named pipe.
# Use this option to view your gateway's log messages
# from the log_pipe_file defined bellow.
# To do so, run the following command on another terminal:
#   cat "log_pipe_file"
log_pipe=0
log_pipe_file=/tmp/mysgw.pipe

# Enable logging to syslog.
syslog=0

# EEPROM settings
eeprom_file=/etc/mysensors.eeprom
eeprom_size=1024

# Software signing settings
# Note: The gateway must have been built with signing
#       support to use the options below.
#
# To generate a HMAC key run mysgw with: --gen-soft-hmac-key
# copy the new key in the line below and uncomment it.
#soft_hmac_key=
# To generate a serial key run mysgw with: --gen-soft-serial-key
# copy the new key in the line below and uncomment it.
#soft_serial_key=

# Encryption settings
# Note: The gateway must have been built with encryption
#       support to use the options below.
#
# To generate a AES key run mysgw with: --gen-aes-key
# copy the new key in the line below and uncomment it.
#aes_key=
Test
The following parameters are supported:
Usage: mysgw [options]

Options:
  -c, --config-file          Config file. [/etc/mysensors.conf]
  -h, --help                 Display a short summary of all program options.
  -q, --quiet                Quiet mode, disable log messages written to the terminal.
  --daemon                   Run as a daemon.
  --gen-soft-hmac-key        Generate and print a soft hmac key.
  --gen-soft-serial-key      Generate and print a soft serial key.
  --gen-aes-key              Generate and print an aes encryption key.
The gateway needs root privilege to run, debug is on by default:
sudo ./bin/mysgwThe following message indicates that communication with the radio module failed:
mysgw: Starting gateway...
mysgw: Protocol version - 2.3.0-beta
mysgw: MCO:BGN:INIT GW,CP=RNNG---,VER=2.3.0-beta
mysgw: TSM:INIT
mysgw: TSF:WUR:MS=0
mysgw: !TSM:INIT:TSP FAIL
mysgw: TSM:FAIL:CNT=1
mysgw: TSM:FAIL:PDT
A success message would be:
Jun 21 06:36:58 INFO  Starting gateway...
Jun 21 06:36:58 INFO  Protocol version - 2.3.0
Jun 21 06:36:58 DEBUG MCO:BGN:INIT GW,CP=RPNGL---,VER=2.3.0
Jun 21 06:36:58 DEBUG TSF:LRT:OK
Jun 21 06:36:58 DEBUG TSM:INIT
Jun 21 06:36:58 DEBUG TSF:WUR:MS=0
Jun 21 06:36:58 DEBUG TSM:INIT:TSP OK
Jun 21 06:36:58 DEBUG TSM:INIT:GW MODE
Jun 21 06:36:58 DEBUG TSM:READY:ID=0,PAR=0,DIS=0
Jun 21 06:36:58 DEBUG MCO:REG:NOT NEEDED
Jun 21 06:36:58 DEBUG Listening for connections on 0.0.0.0:5003
Jun 21 06:36:58 DEBUG MCO:BGN:STP
Jun 21 06:36:58 DEBUG MCO:BGN:INIT OK,TSP=1
If the test fails you are very welcome to ask for help in the forum. Make sure you include:
- a general description of what you are trying to do (ex: build a Raspberry Pi ethernet gateway with nrf24l01+ and connect to Domoticz)
- the exact configure command you used
- the output from the test
- the settings you used in your controller
Install
To install run:
sudo make installExpected output:
Installing bin/mysgw to /usr/local/bin
install -m0644 initscripts/mysgw.systemd /etc/systemd/system/mysgw.service
systemctl daemon-reload
To start service automatically when the Raspberry boots:
sudo systemctl enable mysgw.serviceNow either reboot the Pi, or run this command to start the gateway:
sudo systemctl start mysgw.serviceTroubleshooting
The gateway logging is controlled through the configuration file. There are 3 different options that can be used to enable the gateway logs, and by default they are all disabled:
- Log to a file: To enable it, you need to set the following options on your configuration file
log_file=1 log_filepath=/tmp/mysgw.log - Syslog: To enable it, you need to set the following options on your configuration file
syslog=1tail -f /var/log/syslog - Named pipe: A linux special file type, does not store the log messages, and can be used to view incoming log messages.
To enable it, you need to set the following options on your configuration file
log_pipe=0 log_pipe_file=/tmp/mysgw.pipecat /tmp/mysgw.pipe
Wiring
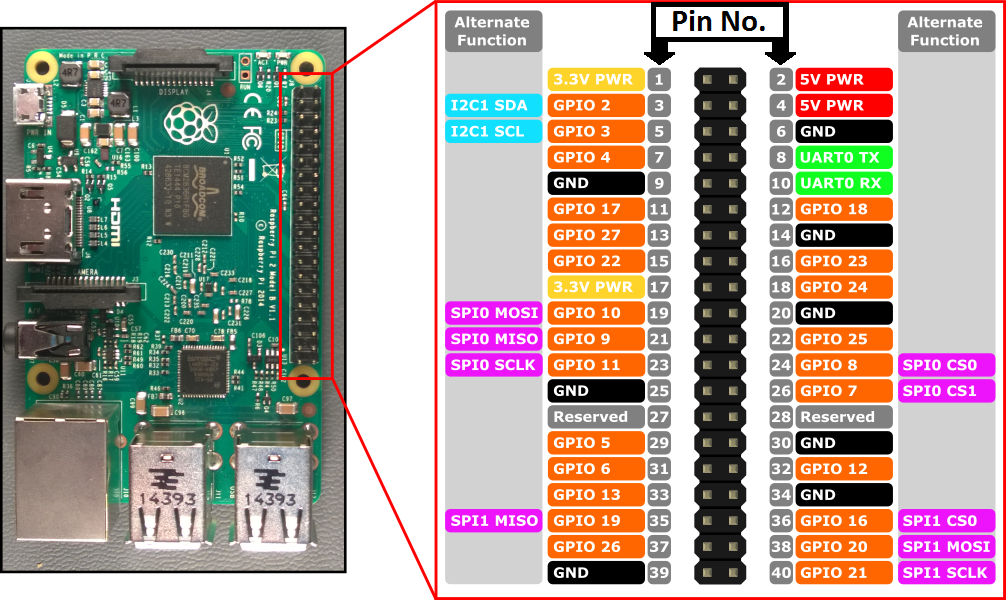
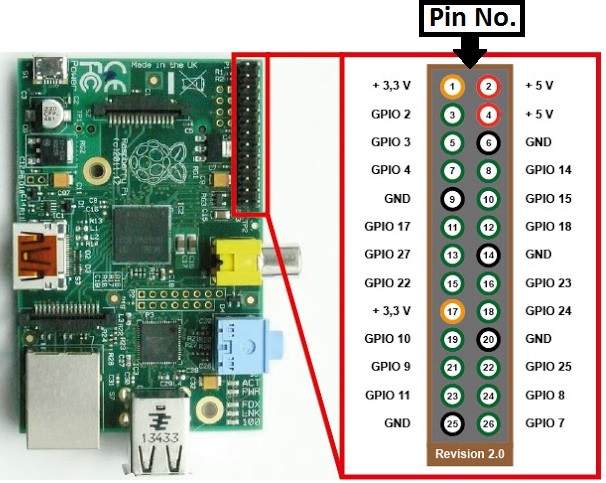
Use the Pin No. and not the GPIO.
Raspberry Pi 2/3
Raspberry Pi 1
NRF24L01+ Radio
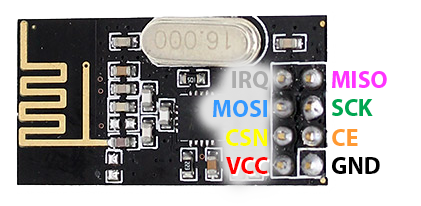
| Raspberry | NRF24L01+ | Color |
|---|---|---|
| GND | GND | Black |
| 3.3V*()** | VCC | Red |
| 22 | CE | Orange |
| 24 | CSN/CS | Yellow |
| 23 | SCK | Green |
| 19 | COPI/MOSI | Blue |
| 21 | CIPO/MISO | Violet |
| 15*(\*)** | IRQ | Gray |
*(): The nrf24 **needs a capacitor as described on this page. If you are using the NRF24L01+ PA/LNA version you need to use a 5V->3.3V regulator because the Raspberry Pi 3.3V can't supply enough power.
(**): Optional, more info here.
RFM69 Radio
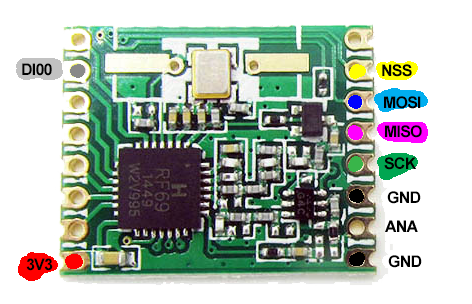
| Raspberry | RFM69 | Color |
|---|---|---|
| GND | GND | Black |
| 3.3V | VCC | Red |
| 24 | NSS | Yellow |
| 23 | SCK | Green |
| 19 | COPI/MOSI | Blue |
| 21 | CIPOMISO | Violet |
| 22 | DI00 | Gray |
| ANA | Antenna* | |
| RST | Not used ** |
* Solder a piece of wire, more info here
** Adafruit modules need RST connected to GND, or to MY_RFM69_RST_PIN
Improving throughput for rf24
Note: The use of this functionality must be used with caution, there is a known issue that is still under investigation.
Normally the gateway asks the rf24 module if a new radio message is available and then sleep a few milliseconds before asking again. This is necessary to avoid high CPU usage. During the gateway sleeping period, the module will still listen for new messages, but if multiple messages arrive, it won't take all.
There is another method were the interrupt pin from the rf24 modules is used to inform when a new message arrives and it's immediately added to a queue for further processing. To use this method connect the interrupt pin from the rf24 module to your Raspberry Pi (check the wiring part for more details) and use the "--my-rf24-irq-pin=PIN" option to build the gateway.
In the following example, the interrupt pin is connected to the Raspberry Pi pin 15:
--my-transport=rf24 --my-rf24-irq-pin=15Information LEDs
The following is an example of how to add LEDs for ERR/RX/TX blinking.
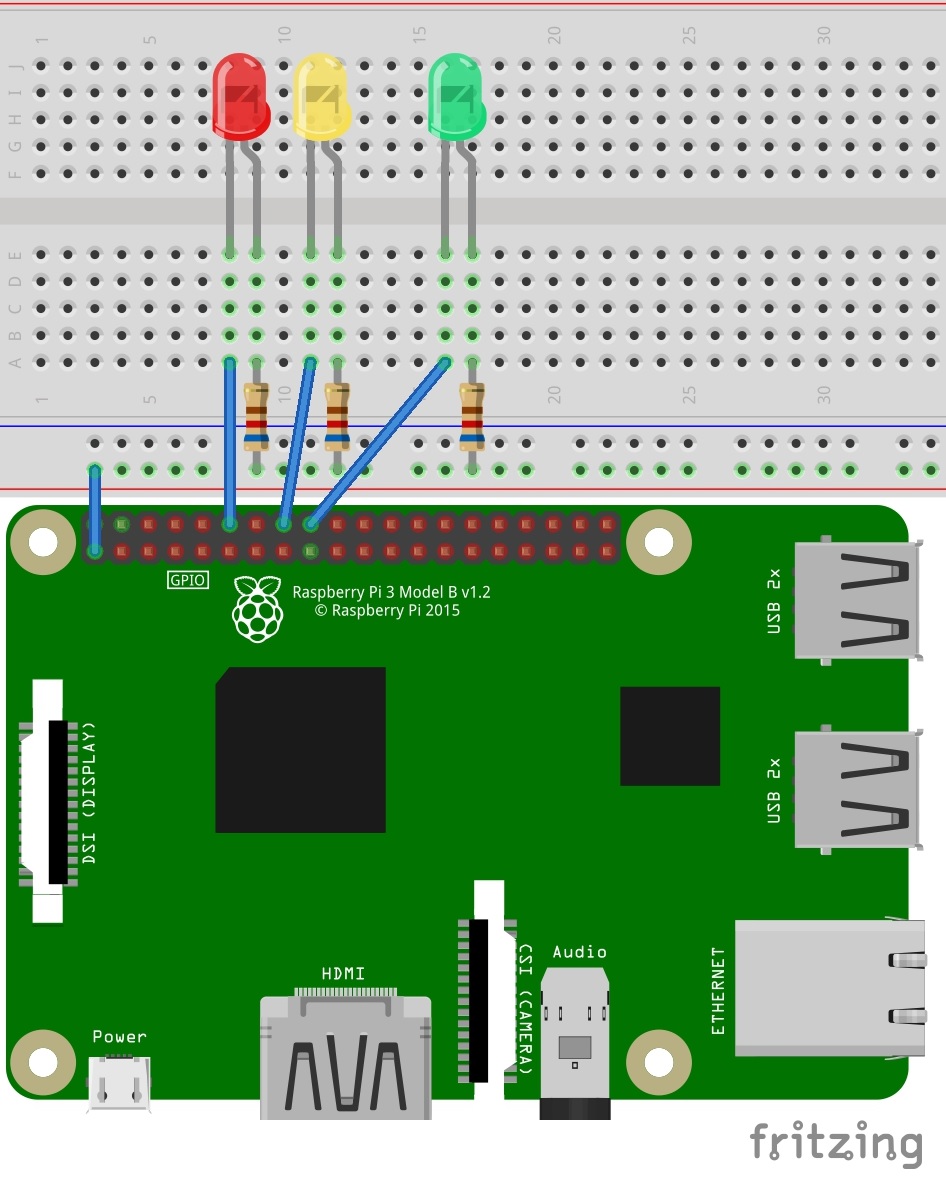
| Raspberry | Led | Color |
|---|---|---|
| 12 | ERR | Red |
| 16 | RX | Yellow |
| 18 | TX | Green |
--my-leds-err-pin=12 --my-leds-rx-pin=16 --my-leds-tx-pin=18Advanced
Other customizations can be made by editing the file example_linux/mysgw.cpp
It is also possible to set any define from the configure command by adding it to --extra-cxxflags. Example for turning on rfm95 debug:
--extra-cxxflags="-DMY_DEBUG_VERBOSE_RFM95"Example for setting RF24 message buffer size and data rate:
--extra-cxxflags="-DMY_RX_MESSAGE_BUFFER_SIZE=\(32\) -DMY_RF24_DATARATE=\(RF24_2MBPS\)"