Sometimes you might want to control more advanced scenarios in your home automation project. This is when a scene controller comes in handy.
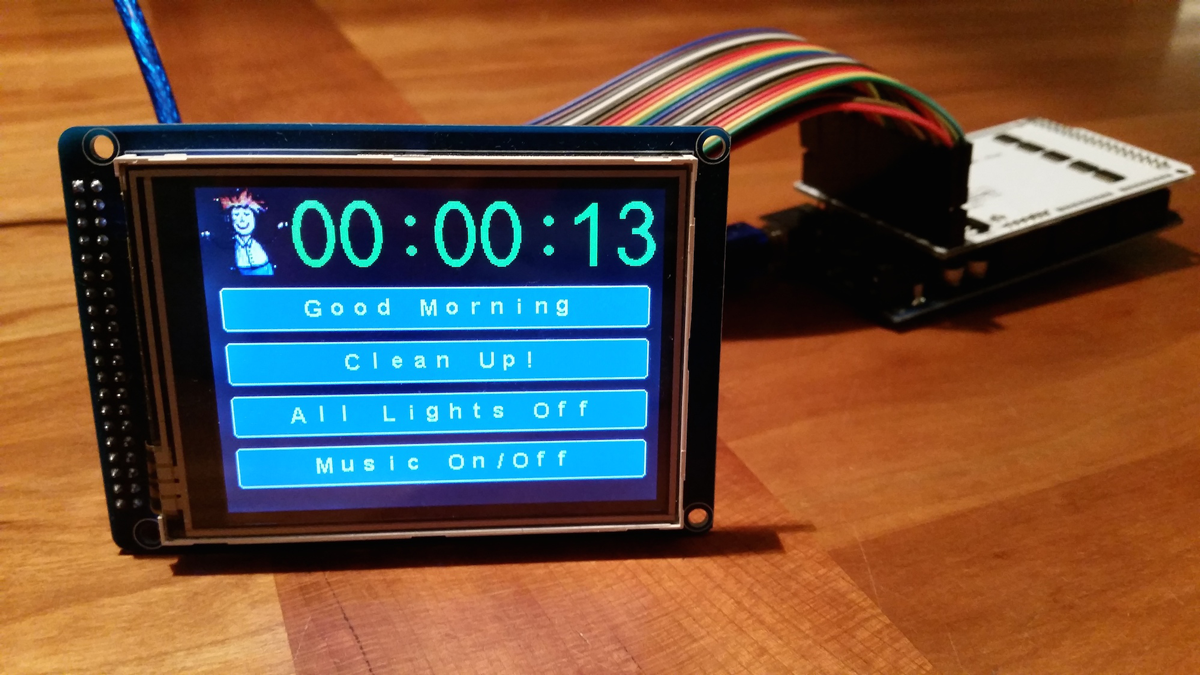
In this example we’ve used a touch screen to display the scene launch options. The buttons can be customized in the sketch code to your preference. With a little hacking you could even change button functions depending on the time of the day or create a full fledged menu system.
If you prefer to keep it simple you can skip the touch display and just attach a few buttons to your arduino to trigger the scene commands.
The provided example also displays the time in the top right corner. If you need more space for your buttons you can remove this part if you want.
The touch screen used here did not like to share SPI with the NRF24L01 radio. We had to move the radio to a separate software driven SPI interface. The wire instructions below show where to connect things.
Demonstration
Here is a little video showing the scene controller in action:
For a more simple scene controller using keypad, have a look at [petewills](http://forum.mysensors.org/user/petewill) project [here ](http://forum.mysensors.org/topic/2001):Wiring Things Up
This sensor mostly consists of the ATMega 2650, shield and display which is easy to snap together. The only thing left you need to connect is the radio. We choose to solder the wires onto the display shield but you might be able to temporarily connect the cables using dupont wires while testing. The 3v3 output of the ATMega2650 is a bit noisy so we choose to use a step down regulator from 5V->3v3 to smooth things out a bit (see buying guide below).
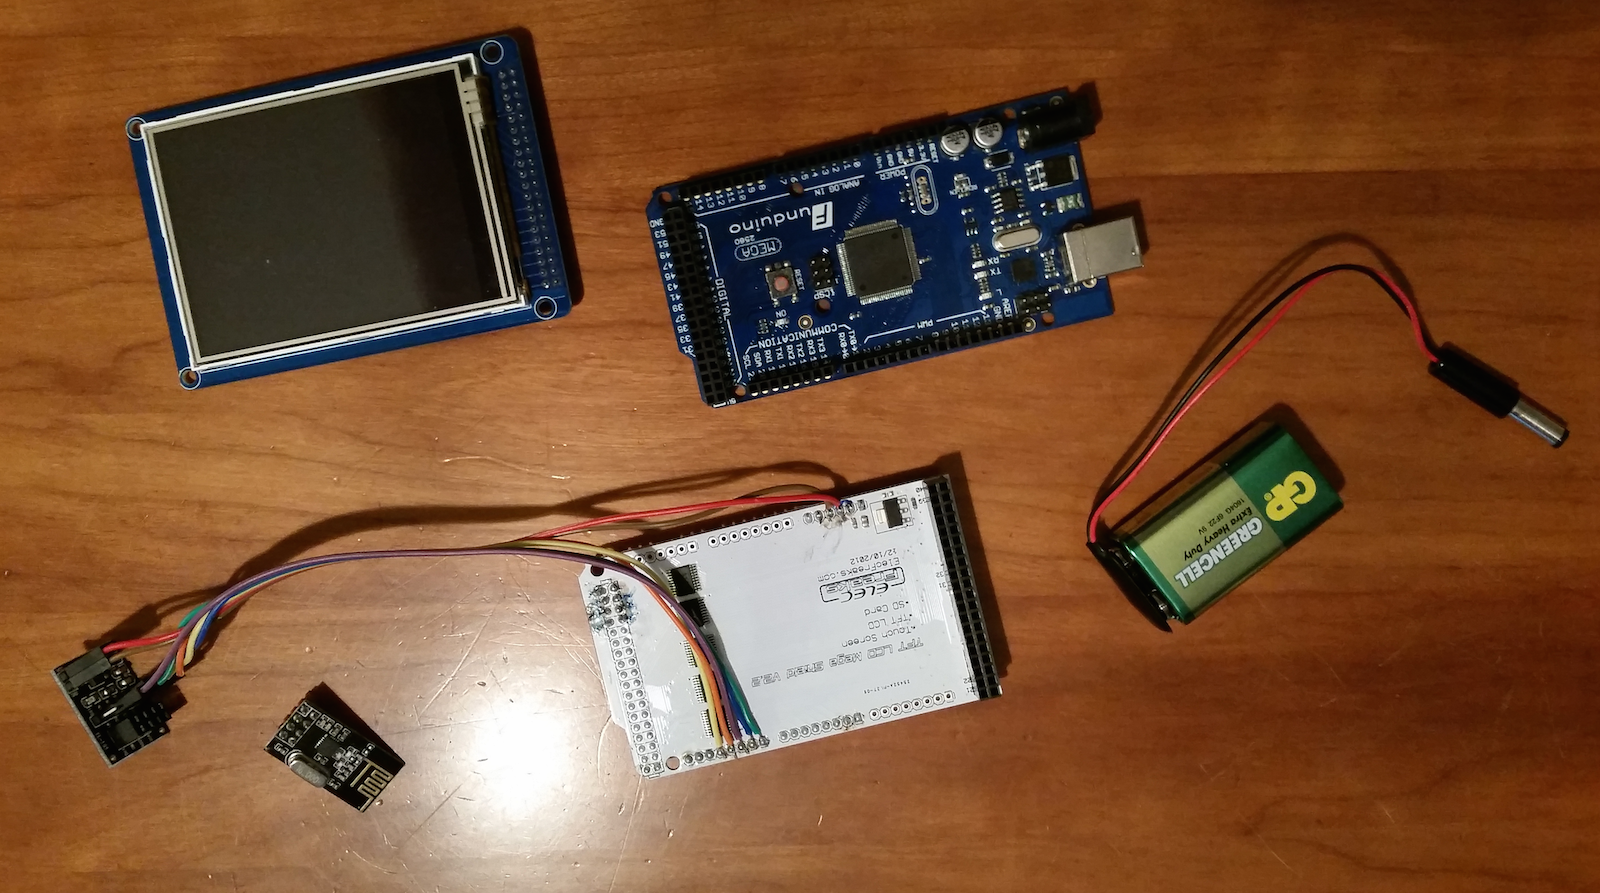
| AtMega 2650 Arduino | Step Down Module/Radio | | --- | --- | | GND | GND | | 5V | Step Down module VCC | | 14 | SCK | | 15 | MOSI | | 16 | MISO | | 17 | CE | | 18 | CSN |
Example
This example uses the external libraries UTFT, UTouch, UTFT_Buttons and TimeLib found here. Please install them and restart the Arduino IDE before trying to compile. It also depends on some external source files found in the example folder.

/**
 * The MySensors Arduino library handles the wireless radio link and protocol
 * between your home built sensors/actuators and HA controller of choice.
 * The sensors forms a self healing radio network with optional repeaters. Each
 * repeater and gateway builds a routing tables in EEPROM which keeps track of the
 * network topology allowing messages to be routed to nodes.
 *
 * Created by Henrik Ekblad <[email protected]>
 * Copyright (C) 2013-2015 Sensnology AB
 * Full contributor list: https://github.com/mysensors/Arduino/graphs/contributors
 *
 * Documentation: http://www.mysensors.org
 * Support Forum: http://forum.mysensors.org
 *
 * This program is free software; you can redistribute it and/or
 * modify it under the terms of the GNU General Public License
 * version 2 as published by the Free Software Foundation.
 *
 *******************************
 *
 * REVISION HISTORY
 * Version 1.0 - Henrik Ekblad
 *
 * DESCRIPTION
 * http://www.mysensors.org/build/scene_controller
 * Touch Display Scene Controller build using a touch enabled tft display
 * attached to a ATMega 2560. This example fetches time from controller and sends
 * in scene commands to the controller.
 * Short press sends V_SCENE_ON and long press (>0.5sec) sends V_SCENE_OFF.
 *
 * Henrik Ekblad <[email protected]>
 *
 * This example uses:
 * UTFT library: http://www.henningkarlsen.com/electronics/library.php?id=51
 * Convert your own images here: http://www.henningkarlsen.com/electronics/t_imageconverter565.php
 *
 * The 3v3 output on the ATMega2560 is especially bad. I had to use a step down
 * on the 5V output to get solid transmissions.
 *
 *
 * Connect radio
 * ----------------------------------
 * Radio               Arduino Pin
 * ----------------------------------
 * GND                 GND
 * 5V  -> Step down -> 3V3   (see buying guide for help finding step-down)
 * SCK                 14
 * MOSI                15
 * MISO                16
 * CE                  17
 * CSN                 18
 *
 */

// Enable debug prints to serial monitor
#define MY_DEBUG

// Enable soft spi as radio has a hard time sharing spi
#define MY_SOFTSPI

// Enable and select radio type attached
#define MY_RADIO_RF24
//#define MY_RADIO_RFM69

#include <TimeLib.h>
#include <SPI.h>
#include <MySensors.h>
#include <stdarg.h>
#include <UTFT.h>
#include <UTouch.h>
#include <UTFT_Buttons.h>
#include <avr/pgmspace.h>
#include "arial_bold.c"
#include "ArialNumFontPlus.c"
#include "logo.c"

#define CHILD_ID 1

int LONG_PRESS = 500; // Number of millisecons to trinnger scene off for button push
int RESEND_DEBOUNCE = 2000; // Number of millisecons interval between sending of same
                            // scene number again.
                            // This is used to avoid unwanted re-trigger when using
                            // a sensetive touch diplay.

// Add your buttons here. Max is 5 if you still want time at the top.
char *buttons[] = {
    (char *)"Good Morning",
    (char *)"Clean Up!",
    (char *)"All Lights Off",
    (char *)"Music On/Off"
  };

const int buttonCount = sizeof(buttons)/sizeof(char *);
const int padding = 10;
const int topBarHeight = 60;

MyMessage on(CHILD_ID, V_SCENE_ON);
MyMessage off(CHILD_ID, V_SCENE_OFF);

UTFT myGLCD(ITDB32S,38,39,40,41);
UTouch  myTouch( 6, 5, 4, 3, 2);
UTFT_Buttons  myButtons(&myGLCD, &myTouch);
bool timeReceived = false;
unsigned long lastTimeUpdate=0, lastRequest=0;
char timeBuf[20];


void setup()
{
  myGLCD.InitLCD();
  myGLCD.clrScr();
  myGLCD.setFont((uint8_t*)ArialNumFontPlus);
  myGLCD.setColor(100, 255, 100);
  myGLCD.setBackColor(0, 0, 0);
  myGLCD.drawBitmap (0, 0, 60, 60, (unsigned int*)logo);

  myTouch.InitTouch();
  myTouch.setPrecision(PREC_MEDIUM);

  myButtons.setButtonColors(VGA_WHITE, VGA_GRAY, VGA_WHITE, VGA_RED, VGA_BLUE);
  myButtons.setTextFont((uint8_t*)arial_bold);
  int height = (myGLCD.getDisplayYSize()-topBarHeight-(padding*(buttonCount+2)))/buttonCount;

  // Add buttons
  for (int i=0; i<buttonCount;i++) {
    int y = topBarHeight + padding+(i*(height+padding));
    myButtons.addButton( padding, y, myGLCD.getDisplayXSize()-padding*2, height, buttons[i]);
  }
  myButtons.drawButtons();

  // Request time from controller.
  requestTime();
}

void presentation()  {
  // Send the sketch version information to the gateway and Controller
  sendSketchInfo("Scene Ctrl", "1.0");
  present(CHILD_ID, S_SCENE_CONTROLLER);
}


int lastPressedButton = -1;
unsigned long lastPressedButtonTime = 0;

void loop()
{
  unsigned long now = millis();

  if (myTouch.dataAvailable()) {
    int pressedButton = myButtons.checkButtons();

    if (pressedButton>=0) {
      bool longPress = millis()-now>(unsigned long)LONG_PRESS;

      if (pressedButton != lastPressedButton || now-lastPressedButtonTime > (unsigned long)RESEND_DEBOUNCE) {
        if (longPress) {
          send(off.set(pressedButton));
          Serial.print("Long pressed: ");
        } else {
          send(on.set(pressedButton));
          Serial.print("Pressed: ");
        }
        Serial.println(pressedButton);
        lastPressedButton = pressedButton;
        lastPressedButtonTime=now;
      }
    }
  }

  // If no time has been received yet, request it every 10 second from controller
  // When time has been received, request update every hour
  if ((!timeReceived && now-lastRequest > (unsigned long)10*1000)
    || (timeReceived && now-lastRequest > (unsigned long)60*1000*60)) {
    // Request time from controller.
    Serial.println("requesting time");
    requestTime();
    lastRequest = now;
  }

  // Update time every second
  if (timeReceived && now-lastTimeUpdate > 1000) {
    printTime();
    lastTimeUpdate = now;
  }
}


// This is called when a new time value was received
void receiveTime(unsigned long time) {
  // Ok, set incoming time
  setTime(time);
  timeReceived = true;
}

void printTime() {
  sprintf(timeBuf, "%02d:%02d:%02d", hour(), minute(), second());
  myGLCD.print(timeBuf, 60,7);
}